Learning Bar Chords |
||
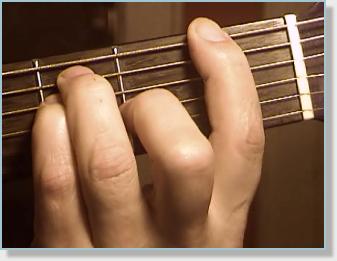
Start with an F major chord. One at a time, put each finger in place. Be sure to lay down the bar last. As you place each finger—and this is the important point—do not apply pressure. Merely put each finger lightly in place. Do this deliberately and slowly, ensuring each non-bar finger is curved and each fingertip is snug against its fret. When you finally have each finger correctly placed and the bar laid across the six strings, examine your left hand closely. Make sure your left hand looks exactly as it should. Again, do not apply pressure. Your fingers should only lightly touch the strings. (If you strum with your right hand, you’ll hear nothing but muted strings.) When you’re satisfied that each finger is correctly placed, now suddenly apply pressure with your left hand and strum with the right. Try to keep your non-bar fingers from collapsing as you do this. Immediately after the strum, release the pressure and allow your left hand to relax. If done right, you’ll have heard a reasonably clear chord, albeit very brief. As you experiment further with this procedure, try holding the left hand pressure a little longer each time. The purpose of this procedure is to help you set up a perfect finger position each time you practice a bar chord. If you immediately apply pressure as you place each finger, your fingers inevitably fall out of perfect position. You simply don’t yet have the strength and coordination to keep your fingers in a good rounded position during the time it takes to get them all properly placed. By delaying the pressure until all your fingers are properly set, you give yourself a chance to get a clear chord before your fingers collapse under the pressure. And by playing the chord cleanly, however briefly, you’re cultivating a better understanding of the correct feel.
Here are other things to bear in mind as you practice bar chords: • Place the bar so that a string doesn’t sit directly under a joint of your finger. This makes it easier to avoid muting a string. • Don’t assume that every string must be firmly held by the bar. For example, when playing an F major chord, three of the strings are held down by fingers other than the bar. Only the first, second, and sixth strings must be held cleanly by the bar, so if the other strings aren’t perfectly held by the bar, it doesn’t matter, since they’re held down by other fingers. (For this reason, the most difficult bar chords are often the ones that use the fewest fingers.) • In a well placed bar, your first finger will be rolled slightly on its side, rather than flat on its middle.
Here’s an advanced bar exercise recommended by concert guitarist David Russell. Lay your first finger across all six strings at the fifth fret. Be sure that all six strings sound clearly. Now, by carefully varying the pressure of your finger, do the following: 1) Allow the first and second strings to mute or buzz, but keep the other strings cleanly sounding. 2) Allow the fifth and sixth strings to mute or buzz, but keep the other strings cleanly sounding. 3) Allow the third and fourth strings to mute or buzz, but keep the other strings cleanly sounding. The point of this exercise is to finely control the pressure of your barring finger. In describing this exercise, Russell noted that many students, faced with a single buzzed or muted note while doing a full bar, will press harder with the entire bar—obviously this is a brute force solution. It’s better to press harder only the part of the bar where the buzzed or muted note is.
While not specific to bar chords, here’s a very useful left hand exercise. It’ll help alert you to excess pressure when fretting a note or chord. Fret a note with your left hand finger (any finger, fret, or string will do) and repeatedly play the note with your right hand. As you continue playing the note, gradually let up the pressure with your left hand finger until the note begins to buzz. Stop letting up the pressure, but continue playing the note, with the buzzing. Now, as you continue playing, slowly increase your left hand pressure until the buzzing stops. Exactly at this point, stop increasing the pressure. You’ve now found exactly how much left hand pressure you need to get a clean note. Any extra pressure past the point where the buzzing stopped is excess pressure. Notice how this exercise is perfectly tailored to whoever is doing it, regardless of physical differences between players. This exercise even tailors itself to different guitars or strings. Any person playing any guitar on any kind of strings will automatically get an accurate feel for how much pressure to use when fretting a note. What I like about this exercise is that, for it to work, you don’t have to be sensitive to excess tension. And that’s the crux of the matter. To be useful, an excercise like this must alert you to excess tension even if you’re oblivious to it. In the exercise I’ve just described, the buzzing—something so obvious that anyone will notice it—instantly alerts you to insufficient pressure. And at the instant the buzzing ceases as you increase pressure, no additional pressure is needed. Even a player oblivious to excess tension can understand the folly of pressing harder after the buzzing stops. What begins as listening for buzzing will evolve into a deeper physical sensitivity to the thing itself: excess tension. To download a PDF of this article, click here.
|
||
 For beginners, bar chords are tough. Most of us fail miserably in our early tries, and typically it takes a long time before we can play bar chords well. This is because our left hand lacks the necessary strength and coordination. When students try to do a bar chord, their finger joints immediately collapse rather than stay in a firm and rounded position. This is almost inevitable. The pressure needed to do a bar makes it practically impossible to keep the fingers correctly positioned. With this problem in mind, here